Analytics 101 – Setting Up Proper Goals in Google Analytics
Analytics 101 – Setting Up Proper Goals in Google Analytics
To make sure your business is on the right track toward growth
It’s important to set goals – but perhaps what’s even more important is making sure you have systems in place that will help you track your progress toward achieving those goals. Thanks to Google Analytics, it’s fairly easy to set and track goal progress directly from within your dashboard.
To create, edit, and share goals in Google Analytics, you must have Edit permission at the View level in the account you’re working with. If you do not, speak to the administrator of your account to have those enabled.
Step 1: Creating a New Goal
To make sure your business is on the right track toward growth, it’s important to set goals – but perhaps what’s even more important is making sure you have systems in place that will help you track your progress toward achieving those goals. Thanks to Google Analytics, it’s fairly easy to set and track goal progress directly from within your dashboard.
To create, edit, and share goals in Google Analytics, you must have Edit permission at the View level in the account you’re working with. If you do not, speak to the administrator of your account to have those enabled.
You have three options for creating goals:
- Use a template.
- Create a custom goal.
- Create a smart goal.
Step 2: Using a Template to Create a New Goal
Choose a Template from the list, and click Next to complete the Goal setup. Templates are included within Google Analytics on an industry basis. If your account does not have an industry category selected, you won’t see this option. Once you choose your industry, you can see a list of available templates to use for goal creation.
Step 3: Creating a Custom Goal
Choose Custom from the list of options, click Next Step, then select the Type of Goal, and click Next to continue setting up your goal.
There are several types of goals:
- Destination goals
- Duration goals
- Event goals
- Pages/Screens per session
Destination goals treat a pageview or screenview as a conversion. Enter the screen name or page URL in the Destination field. Specify the match type as Equals to, Begins with, or Regular expression. If you want to track the success of your funnel, you’ll turn on the Funnel option, and for each step in the funnel, click +Add another Step, then enter a page name or an app screen name, as you did in the Destination field.
If you want to measure user engagement, you’ll treat the session time as a conversion. Choose the hours, minutes, and seconds to set the minimum session time you want to consider a conversion. Any session that lasts longer than this will count as a conversion.
Event goals treat certain interactions within your site or app as the conversion. Use the Event Conditions to set up at least one event prior to creating this type of goal.
Pages/Screens per session goals also measure user engagement. You can specify a certain number of pages as a conversion, and when a user hits that threshold, it will count as a conversion.
Step 4: Creating a Smart Goal
If your account meets all the necessary prerequisites, you will have the option to create Smart Goals. You’ll follow the same steps to create a goal, then choose Smart Goals from the options, and click “Next Step” to continue.
To be eligible to turn on Smart Goals, you must first link your Analytics to AdWords accounts. Your AdWords account must have sent 500 clicks to the selected Analytics view over the past 30 days before you can set up Smart Goals. If it ever falls below 250 clicks, Smart Goals will deactivate until it hits 500 clicks or more again. Your Reporting View must not show more than 10 million views within 30 days, and you must have data sharing turned on.
Step 5: Goals & Monetary Values
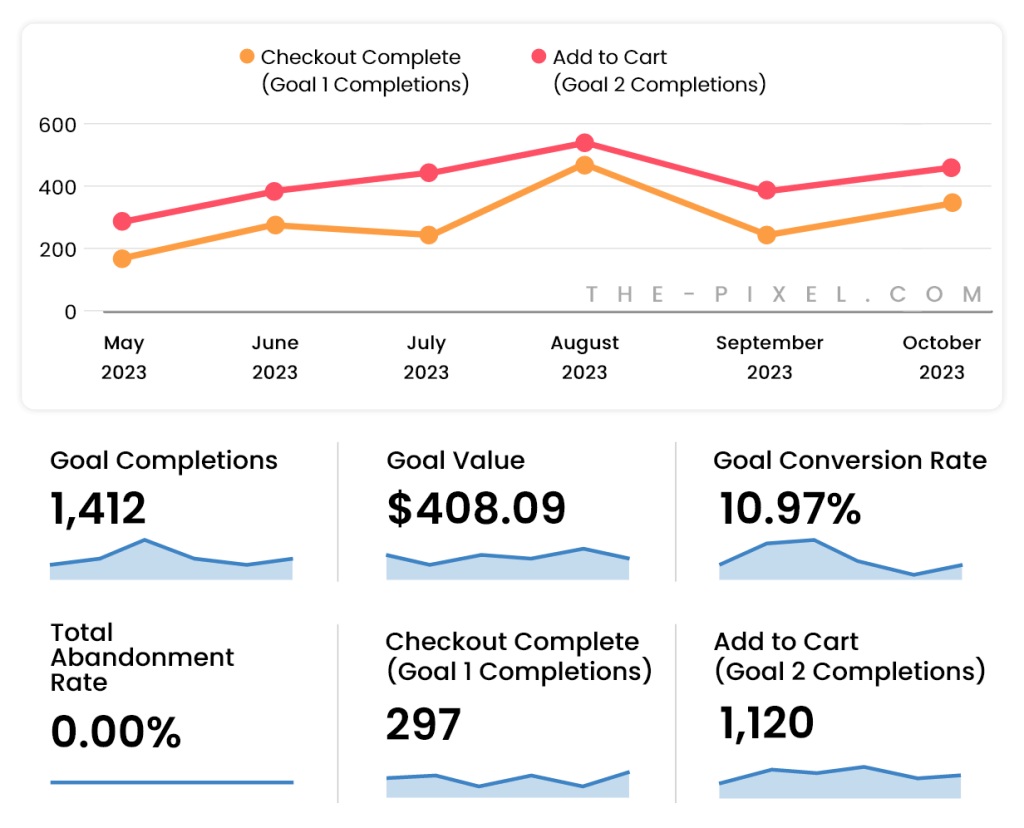
Once you set up Goals in your account, you can assign monetary values to them, to help you determine how much money each page or campaign is helping your business earn. Every goal type, except for Smart Goals, allows you to sign a monetary value to each conversion. If dealing with events for e-commerce, such as when someone purchases a product, there are additional considerations for assigning the monetary value. If you’re tracking a transaction or purchase with the E-commerce Tracking code, leave the Goal Value blank. The actual value of the transaction will appear in the Revenue metric (not the Goal Value metric) and will come from the Ecommerce Tracking code in your shopping cart.
Step 6: Verifying Your Goals
When you’re ready to test your goal to make sure it works, click Verify Goal. It will calculate the conversion rate for the last seven days based on data that’s already in your account. It is not a projection of how well you can expect the goal to convert in the future.
Hire ThePixel to build your next website!
Since our founding in 2008, we’ve created and launched many types of business websites. Over the last decade and we’ve learned a thing or two! That’s why we’re masters of our craft, let us help you build the website of your dreams – one that generates traffic, leads and conversions.
Are you ready to start? If yes, contact ThePixel and one of our representatives will guide you through the website phases and how the process works either by a Zoom Meeting or phone.